Monday, August 29, 2011

A mad scientist's robot platform idea

I went sailing with my family in the weekend (one of those "other hobbies" that have served as an excuse to postpone building my robot), and suddenly I realized that our boat is an almost complete platform for a marine robot. It has the following array of sensors and actuators:

  • GPS
  • Radar
  • Sonar
  • Electronic compass
  • Wind instrument (speed and direction)
  • Speed instrument
  • Autopilot
Best of all, all of these are interconnected by an NMEA 0183 network, so e.g. the autopilot is able to receive route orders from the GPS chart plotter, and the radar image can be superimposed on top of the chart plotter's map. The only things missing are 

a) an NMEA-enabled central control unit that would contain the robot's control logic, and
b) actuators for speed control using the inboard diesel engine or the sails, or preferably both.
Imagine how fantastic it would be to be able to just enter (or even better, speak) the destination and let the boat calculate the route and take you there. The boat would use GPS to navigate, its radar, sonar, wind instrument, and compass to sense what's happening to it and in its environment, and steer using the autopilot. I suspect marine chart data would have to be directly available to the control unit, though, because it cannot be obtained from the chart plotter using NMEA.

I know that controlling the sails would be somewhat tricky. I would definitely have to get a self-tacking headsail and install electric winches for controlling the jib sheets and the mainsheet. I'm not sure if I'd be able to loosen as well as tighten the sheets using a winch, so possibly some custom mechanics and motors would be required. Even so, I wouldn't have proper feedback available to my control algorithm, only the readings of the wind and speed instruments and compass (and GPS). It would be preferable also to know the positions of the sheets and the angle of heel. Come to think of it, also the rudder angle would be nice to know, as well well as some sensor readings that would correspond to the tell-tales on the sails. But these are all optional and I could add them later. Even the entire speed control capability could be omitted. Initially it would be cool just to be able to automatically navigate from A to B while controlling speed manually.

No! Wait! Based on how they behave on the sea, I think some of the bigger motor yachts in this part of the world already are robots. Oh, well.

(Of course, I wasn't the first to think of a robotic sailboat.)

Friday, August 26, 2011

Yikes, a swarm of robots!

(Via Let's Make Robots!)

I think calling this relatively small group of robots called Swarmanoid a "swarm" may be a little exaggerated (although they are planning to extend the swarm size to about 60 'bots total), but this is nevertheless one of the coolest robot projects I've seen lately:


The Swarmanoid has been developed in a Future and Emerging Technologies project funded by the European Comission and coordinated by prof. Marco Dorigo.

I too should perhaps someday look into co-operation of two or more robots. The climbing capability of the handbot is also cool, and the robots seem to use navigational aids embedded in the environment in a clever way. Notice the red color on some of the surfaces of the bookshelf used by the handbot for guidance when climbing. Members of the swarm also act as temporary navigational landmarks for each other.

Thursday, August 25, 2011

What every recreational roboticist should know about computer vision

As I wrote before, I intend to apply some computer vision (CV) algorithms to make SHORT-E more aware of its surroundings. I guess that CV is still not routinely used by recreational roboticists. Hobbyists tend to use simpler sensory information such as that obtained from ultrasonic rangefinders or infrared proximity sensors to make their robots able to navigate in their operation environment.

This is understandable, as computer vision is quite a complicated discipline, the programming tools are not easy to use (or even compile in some cases), and most hobbyists' robots' computational hardware is just not up to the task of executing processor and memory intensive algorithms. However, while I'm not experienced in CV, I happen to have a PhD in computer science and will use Chumby One as my robot's brain, so I'd be a wussy if I didn't at least try to do some rudimentary CV.

For my fellow recreational roboticists that have not yet decided to take the leap: I recommend starting with this nice and popularized introduction to computer vision. If you're impatient, you can safely skip the first part about vision in biology and dive straight into chapters 2...4.

Wednesday, August 24, 2011

Household tags to aid robots

I'm back at work this week, so progress on the robot project will probably slow down a bit. Meanwhile, I'll at least try to post some general robotics-related stuff.

Automaton has a rather interesting article about making our homes more robot-friendly. As progress in computer vision is slow, why wouldn't we embed tags in our homes that assist household robots in their tasks? Using these tags robots could keep track of their location and recognize objects they are supposed to manipulate.

The idea isn't new and it has actually been applied before. I too have thought of someday using RFID or NFC tags to help my robots recognize objects and locations. There are also commercial robot indoor navigation sensor systems like the Hagisonic Stargazer that are based on fixing landmarks to the ceiling. Nevertheless, the concept is interesting and could help make genuinely useful household robots reality.

Tuesday, August 23, 2011

Robot platform videos

I found video reviews of the Traxster II and Lynxmotion 4WD1 robot platforms I mentioned in my earlier post:


The Lynxmotion 4WD1 looks awesome, but the lack of support for shaft encoders keeps bothering me, as I don't think that my optical encoders would work with these wheels. The chassis is available without motors or wheels, so I could purchase motors that have rear shafts for connecting encoders separately, but the total price would be higher, especially as I couldn't get everything I need from a single source inside the European Union. Ordering directly from Lynxmotion is out of the question, because they don't accept international credit cards.

The Traxster II is a bit smaller than I imagined and it does not have a bottom plate. But it does have built-in encoders and is therefore significantly cheaper than the 4WD1 when considering total price with all the parts I need.

Monday, August 22, 2011

More robot soccer!

Some rather good action in a humanoid robot soccer game:


The non-humanoid robots are much better players than humanoid machines:


OpenCV and a webcam stream: a fail and a win

I managed to compile OpenCV with FFmpeg support for the Chumby. Unfortunately this did not solve my problem, because FFmpeg is not able to decode the MJPEG stream from my web camera via mjpg_streamer. I've found an another solution that works, though! More on that in the end of this post.

OpenCV with FFmpeg does work with video files (I tested with an AVI DIVX file) and might work with the stream generated by some other web camera, so I'm including some notes on how to repeat the build procedure:

  • I got the latest FFmpeg source code using git clone git://git.videolan.org/ffmpeg.git. This was perhaps a mistake, because it turned out that compatibility with OpenCV 2.2.0 had been broken at some point. Fortunately I found patches that fixed this issue in the OpenCV source code.
  • FFmpeg had to be configured with the --enable-shared option. I used the command 
~/chumby-sw/OpenCV-2.2.0/release$ sb2 ./configure --prefix=/home/<my-username>/chumby-buildroot/usr --enable-shared
  • I had to apply another patch to OpenCV-2.2.0 source code to fix some linker errors (../../lib/libopencv_features2d.so.2.2.0: undefined reference to `cv::SIFT::SIFT(double, bool, bool, int, int, int, int)' etc.)
  • I used the following commands to configure and build OpenCV:
~/chumby-sw/OpenCV-2.2.0/release$ sb2 cmake -D CMAKE_BUILD_TYPE=RELEASE -D CMAKE_INSTALL_PREFIX=/home/<my-username>/chumby-buildroot/usr -D BUILD_PYTHON_SUPPORT=OFF -D BUILD_NEW_PYTHON_SUPPORT=OFF .. 
~/chumby-sw/OpenCV-2.2.0/release$ sb2 make
The working solution I mentioned above is simply to decode the motion-JPEG stream generated by mjpg_streamer manually and use some functions from libjpeg together with OpenCV's cvCreateImageHeader and cvCreateData to convert the individual JPG images into OpenCV's IplImages. I found some sample code that I could easily modify to suit my purposes.

Working on getting things to work on the Chumby

Recently I've been working on a couple of things related to my robot project.

  1. Getting Chumby and Arduino to talk to each other via USB serial. I've successfully completed a simple test where the Chumby sends an ASCII message to the Arduino, and the Arduino then shows the message on its LCD and echoes it back to the Chumby. Still to be done: writing a proper communication protocol that will be used by SHORT-E.
  2. Trying to build and install a working version of the OpenCV computer vision library for the Chumby. It has not been easy. The current status is such that I managed to compile and install OpenCV, but for some reason it cannot load JPEG or PNG images even though I have built libjpeg and libpng for the Chumby and they work ok with other software (at least Fswebcam is able to use them). And even worse, OpenCV cannot seem to get proper frames directly from my webcam, even though it manages to trigger the camera to capture something.
I had to use OpenCV 2.2.0 because I couldn't configure the latest version not to support Python - and OpenCV's stupid CMake configuration scheme makes it next to impossible to cross-compile a version that does support Python. And I do have Python on my Chumby.

Currently I'm able to use OpenCV with BMP images, and I've found a piece of code that does JPEG to BMP conversion using libjpeg. I'm still hoping to get OpenCV to support my web camera by trying to compile a version of OpenCV that uses FFmpeg. First I'll of course have to build FFmpeg for the Chumby.

I'm hoping to be able to implement some sort of simple tracking functionality using OpenCV. E.g. have SHORT-E find and drive to a red ball or even follow a moving person. Hopefully Chumby's processing power will suffice for something like this.

Sunday, August 21, 2011

Finding a new robot platform

Although I haven't yet completed my first version of SHORT-E built on the Scooterbot two-wheel platform, I have already started pondering about what my next robot will be like. As I wrote in my earlier post, the Scooterbot cannot really move on anything else than hard floor. We do have wooden floors in our apartment, but there are also rugs and thresholds that pose a big problem for SHORT-E.

Although I won't probably be getting a new platform at least for a few months, I've listed my (currently known) requirements and started to sketch a list of alternatives.

Here are my requirements:


  • Tracked, four-wheeled, six-wheeled, or similar type that can move also on carpets and rugs, and overcome small thresholds and obstacles.
  • Preferably available as an off-the-shelf kit, with chassis, wheels, motors, etc.
  • Big enough to have room to mount a Chumby One in addition to batteries, an Arduino, web camera, sensors, etc.
  • Possibility to mount a gripper or a robot arm.
  • Preferably enough space inside the chassis for batteries, Arduino and a small breadboard or printed circuit board.
  • Shouldn't cost more than 500€, and the cheaper the better.


My current list of alternatives is pretty short:

  • Large enough, seems pretty rugged.
  • Enough room inside for batteries and electronics.
  • Good-sized surface to mount Chumby, camera, sensors, and gripper on. 
  • Includes two DC motors but no batteries or electronics.
  • Motors have integrated quadrature encoders, which is nice.
  • Price: 192.55€ 


Lynxmotion Aluminum 4WD1 Rover

  • Also large and rugged.
  • Some room inside, at least for batteries.
  • Specially designed add-ons and accessories available: gripper kit, extra decks, etc.
  • Includes four DC motors but no batteries or electronics.
  • Where to fit shaft encoders? The motors included do not seem to have rear shafts. Would perhaps have to buy different motors, which would add to the cost.
  • Price: 235.43€


  • Small, but might be just large enough with the optional expansion plate.
  • Comes complete with an Arduino Duemilanove. Although I already have one, it wouldn't hurt to have two (no need to butcher SHORT-E for parts).
  • Comes with the Tamiya Twin Motor Gearbox and a DC motor controller for the Arduino. No rotary encoders, but I could probably install my CNY70 based ones. I found a good article on how to modify this gearbox for adding encoders.
  • According to the user guide, Lynxmotion Little Grip should fit. Weight would have to be added to the rear, but this wouldn't be a problem - I have to put the Chumby somewhere. I'm more worried whether the robot would be powerful enough to carry everything.
  • Perhaps too small for everything I want to install?
  • Cheap, price is 89.99€

At the moment the Traxster II is the top contestant, although I do like the specially designed accessories available for the Lynxmotion 4WD1, and the low price of the DFRobotShop Rover plus the fact that it comes with an Arduino and a motor controller.

I would really appreciate comments or advice from other robot builders. I just started this blog a couple of days ago and I know the number of readers is still small (haven't even been properly indexed by Google yet), but maybe there's already someone out there.

Saturday, August 20, 2011

Chumby comes to the house

As I wrote in my earlier post about choosing a robot brain, the Chumby One looks like a perfect Linux-based hacking platform for recreational roboticists on a budget. It has a 454MHz ARM processor, a 3.5" touch screen, audio, WiFi, USB, and it can be powered by an optional Li-ion battery. And, most importanty, it's cheap.

So I bought one.

I haven't connected the Chumby to SHORT-E yet, but I've installed and configured a Scratchbox 2 cross-compilation envinroment for the Chumby in Ubuntu 11.04. I used these instructions. In addition I had to install the realpath command using apt-get.

A word of warning: First I tried to install and configure Scratchbox using these instructions  in the Chumby Wiki. They didn't work at all for me. I had my doubts from the very beginning, as the instructions looked far too complicated. I don't recommend them.

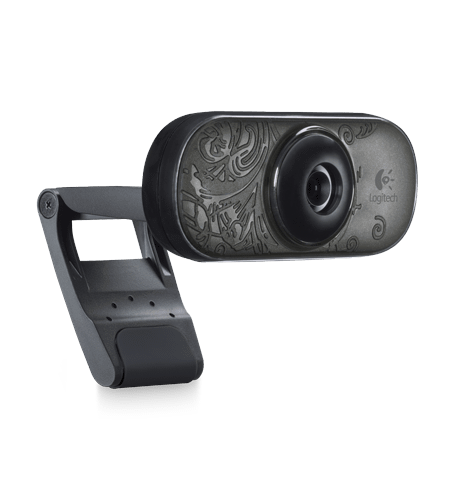
 I have successfully compiled and installed several programs I will use in my project. These include fswebcam for capturing images from a webcam connected to the Chumby (I have successfully used a Logitech C-210) and mjpg-streamer for streaming video from the same webcam (see instructions in this Chumbysphere forum thread). I also compiled and installed the eSpeak speech synthesizer - see demo video below.


The face widget used in the video is just an app I found on chumby.com.

Friday, August 19, 2011

Free as a bird

Even the most advanced humanoid robots like Asimo look pretty awkward on the move, which makes it all the more astonishing how naturally and gracefully the Festo SmartBird flies:


Perhaps also recreational roboticists should get more interested in robots whose movement mechanics are inspired by animals. Judging by how well the SmartBird is doing, birds must be a lot easier to mimick than humans.

Humanoid robot soccer!

A couple of days ago my son and I watched some humanoid robot soccer videos on Youtube. He thought they were hilarious, and I'm inclined to agree. Here are a couple of them:


One of my dreams is to someday build a humanoid robot. These soccer videos show that although there are many fundamental challenges left to solve properly, at least these machines are able to play the game, even though they couldn't probably beat a kid that has just learned to walk.

I'm pretty sure Asimo would single-handedly crush any of the participating teams in these contests. Honda has spent a hefty sum of money on developing it, they are completely in a different league compared to the university research groups that participate in RoboCup. In the video below Asimo kicks a football and shows other tricks as well.

Rotary encoder based on CNY70 photoreflector


As I mentioned earlier, I needed to add rotary encoders on the wheels in order to measure their angular velocities. This was required to enable using a closed loop control algorithm that could keep the robot driving straight with constant velocity.

Rotary encoders are available as off-the-shelf components, complete with encoder disks and sensor modules, but they are somewhat costly considering their simplicity. Many of them are also not suitable for my purposes because there is not much room to mount stuff between the wheel and the servo assembly in SHORT-E.


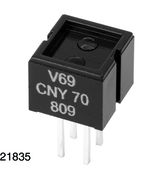
I did some research and decided that I would need photoreflectors. Hamamatsu P306201 was used in Mobile Robots - Inspiration to Implementation, but neither it or its newer replacement, P5587, were available anymore, at least not on this side of the Atlantic Ocean. I then came across Vishay Semiconductors CNY70 that seemed promising. I ordered some online from Elfa. They cost 0.79€ each in a batch of ten.


A photoreflector combines an IR-emitting diode with a phototransistor and is able to sense whether the IR light it emits is reflected back or not. If one is mounted near a spinning wheel that has a striped black-white pattern, an appropriate circuit will produce a logic-level pulse stream whose frequency is directly proportional to the angular velocity of the wheel.

I printed two copies of a 24 stripe pattern I found on the web, cut them to size and glued them to the inside surfaces of SHORT-E's wheels. I then took two CNY70s, soldered wires to each of their pins, and completed two copies of the following circuit on SHORT-E's breadboard:


Note: The orientation of the CNY70 component in the diagram is such that the markings ("V69 CNY70" etc.) are on the right.

This circuit produces output voltages that are close enough to +0V and +5V to pass for logic-level signals. 200Ohms and 10kOhms were the only resistor values I had in my component box, and they probably aren't the absolute best choices, but they seem to work well enough. You could try replacing the 10k with something a bit larger to get closer to +5V when there is white stripe in front of the CNY70 (I now get around +4V).

The CNY70s need to be mounted as close to the striped wheel surfaces as possible, I mean preferably less than half a millimeter according to the datasheet, although it doesn't seem to be too picky about the distance in real life.

The outputs of each circuit (see image above) I connected to pins 2 and 3 on my Arduino. I specifically selected these pins because they can trigger external interrupts. I then simply wrote interrupt handlers that increment pulse counters on each change of the signal, i.e. in setup() I added

pinMode(encoderLeftPin, INPUT);
attachInterrupt(0, doEncoderLeft, CHANGE);
pinMode(encoderRightPin, INPUT);
attachInterrupt(1, doEncoderRight, CHANGE);

Here encoderLeftPin and encoderRightPin are just names that correspond to 2 and 3, i.e. the Arduino I/O pin numbers for external interrupts 0 and 1. Functions doEncoderLeft() and doEncoderRight() simply just increment integer counters.

The code I described above just counts the pulses but does not affect control yet. In addition I implemented a PID controller and spent a few hours tweaking its parameters to get SHORT-E behaving nicely. PID controllers are textbook material and also the Wikipedia article I just linked to contains a nice pseudocode description as well as discussion on what the different parameters do. Therefore I think I won't go into the details here.

SHORT-E: first version video

A few days ago I shot a video of the first working version of SHORT-E driving around in our upstairs hallway:


This version of the robot has the parts listed in my previous post. The motor control is open loop, and thus SHORT-E tends to slowly arc to the left when attempting to drive straight. I've added wheel encoders since making this video. I'll write something about them and implementing closed loop control later.

Initial electronic and electrical parts list

Very quickly I came up with a list of the electronic and electrical parts I would require for the first version of my robot, SHORT-E. I bought the parts from a couple of sources: an Ebay seller in Hong Kong and Robot Shop. This is what I got:

An Arduino starter kit from Ebay (31€ inc. p&p):
  • Arduino Duemilanove w/ ATMega 328
  • breadboard
  • 1602 LCD module
  • USB cable, some jumper wires, potentiometers, LEDs, buttons, resistors, etc.
Other stuff from Robot Shop EU:
  • Devantech SRF05 ultrasonic range finder (sonar)
  • Dagu mini pan&tilt kit w/ two mini servos (for pointing the sonar in different directions)
  • Lynxmotion multi-purpose sensor housing MPSH-01
  • a battery holder for 4 AA batteries (4*1.5V=6V, for powering the servos)
  • a 9V battery jack with an Arduino-compatible plug (for powering the Arduino, obviously)
  • some break-away headers for soldering into the sonar module
I already had:
  • two GWS S03N servos modified for continuous rotation (to be used as drive motors)
I suspect my "Arduino" Duemilanove is not a genuine Arduino. The price was suspiciously cheap and there seem to be some cosmetic differences compared to images of genuine ones. While the design is open source and anyone is allowed to make and sell Arduino-compatible boards, they shouldn't be using the name Arduino. Oh well, the Chinese aren't too strict about these things.

I was planning to add other parts later. With only the parts listed above I would have to resort to open loop motor control, which would probably cause SHORT-E not to be able to drive completely straight, and to slow down if going uphill, etc. So already when I ordered my first batch of parts I knew that I would at least have to get some components for making rotary encoders later.

Choosing a robot brain

Choosing a robot brain took some research and thought. In the beginning I was determined that my robot would run Linux. I wanted to be able to connect a web camera and communicate with the robot using WiFi, and thus a Linux board seemed to be the obvious way to go.

First I considered using a Mini-ITX form-factor Atom-based motherboard. There were few problems, though. First of all, they are relatively expensive, and still a bit too big to be installed on the Scooterbot base. Second, they wouldn't be able to control most robot sensors and actuators without adding a separate controller card. Third, and this is the biggest problem: they consume a lot of power, and would require batteries that are either big and heavy or very expensive.

Then I turned to look at embedded Linux development boards. Many of them looked ok, but they were very expensive. It seems that nobody wants to sell this stuff to hobbyists, and thus the developer packages cost and arm and a leg. Community support also seems scarce, probably because these devices are mostly used commercially.

Next I looked at Chumby One. Now this looked promising. A hacker-friendly, open-source, complete Linux computer with a 454MHz ARM processor, 3.5" touch screen, audio, WiFi, and USB, optional Li-Ion battery, and available for 79€ in my country. The only problem was that it wouldn't easily connect to sensors and actuators, at least without some major hacking of the mainboard. There is also a Chumby Hacker Board that's better equipped for low-level interfacing with stuff, but it costs the same as a complete Chumby One and doesn't have the screen, or the battery compartment.

So, even if I were to eventually use a Chumby, I would need something for interfacing with my sensors and motors. And remembering the first law of recreational robotics, that something could perhaps also initially serve as the first brain of SHORT-E. I would be starting simple. I just needed something I could later connect to a Chumby, i.e. something with USB.

I turned to look at Arduinos. They are Atmel ATMega microcontroller development boards based on open source hardware designs, especially intended for "artists, designers and hobbyists". There is an active community that develops both hardware ("shields" that can be mounted on top of the Arduino board, e.g. DC motor controllers) and software. Extensive libraries and a tailored programming language (simplified C with Arduino-specific extensions) with a custom Integrated Development Environment (IDE) make programming efficient and easy. And best of all, Arduinos can be programmed and interfaced with through USB.

So, I decided that SHORT-E's first little brain would be an Arduino. Later it would perhaps step back and assume the role of a sensor and motor controller as a Chumby or some other Linux box would take over as the main computer.

The birth of SHORT-E: platform

I decided to name my robot SHORT-E (an obvious reference to WALL-E). Applying the first law of recreational robotics, I wanted to start simple and just build something that moves, avoiding bumping into things or getting stuck, at least mostly.

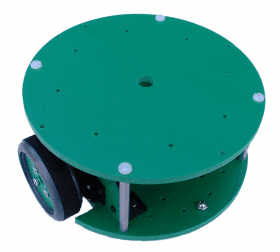
I purchased my robot platform already years ago from Budget Robotics. It's called Scooterbot and looks (almost) like the image here. Mine's blue and the wheels look a bit different.

The Scooterbot platform came with two GWS S03N R/C servo motors pre-modified for continuous rotation. Normally these servos are used for position control and cannot rotate past a limiter, but the modification makes them suitable for use as robot drive motors.

So, SHORT-E will be a two-wheel differential drive robot, i.e. it will be steered by making the left and right wheels spin at different speeds or even in opposite directions. The Scooterbot base is extremely simple: it doesn't even have a third (freely rotating) wheel, but just a plastic knob that slides across the floor, hopefully with minimal friction.

If I were purchasing a robot platform today, I probably wouldn't choose this type. The problem with Scooterbot (and other similar two-wheel designs) is that it is extremely bad at moving on anything else than hard floor. It can just manage on a (non-furry) carpet, but cannot drive over even the smallest of thresholds or climb from plain floor onto a carpet, even a thin one. I would seriously consider a tracked or a four-wheeled base. But, as I happened to have the Scooterbot base lying around, it is what I will use, at least for the first version of SHORT-E.

Servos as robot drive motors, on the other hand, are perfectly in accordance with the first law of recreational robotics, because they are simple to use and control. They generate plenty of torque and can rotate almost arbitrarily slow (unlike DC motors) as well as go fast, and can be directly controlled by the pulse width modulation (PWM) peripherals that are built-in in many microcontrollers.

Robot books

I already mentioned "Mobile Robots - Inspiration to Implementation" by Jones and Flynn (the second edition has a third author, Bruce A. Seiger, but I have the first). It is an inspiring book and a good source of information for the aspiring recreational roboticist. The first edition is a bit dated in some respects, for example I think that the MC68HC11 microcontroller used in the Rug Warrior example is not the first choice for the modern robot builder, because there are easier-to-use and more powerful alternatives, like the ATmega-based Arduino development boards especially designed for hobbyists. Nevertheless, the book contains a lot of useful information, is well written and fun to read.

"Robot Programming - A Practical Guide to Behavior-Based Robotics" also by Joseph L. Jones is a more programmer-oriented introduction to robot building. It's pretty basic and thus suitable for beginners, and perhaps some parts are a bit too basic for more advanced hobbyists, but Jones does a good job of delivering his main point: how to apply the behavior-based approach to programming autonomous robots.

Behavior-based robots react to inputs from their sensors by applying a set of relatively simple behaviors. Unlike industrial robots used on assembly lines, behavior-based robots do not attempt to follow a fixed plan based on a detailed model of the surroundings and items to manipulate. Instead, everything comes as a surprise to them, and they just try to adapt. The total behavior of the robot is an emergent property of the system of low-level behaviors, and could even be something useful or interesting if the designer has been clever.

The first commercially successful household robots, robotic floor cleaners like the iRobot Roomba, have been designed by applying the behavior-based approach. In fact, according to the author profile in "Robot Programming", Jones is one of the inventors of Roomba and works for iRobot.

The three laws of recreational robotics

For as long as I remember, I've been interested in robots. When I was a kid in the 1980's, I read a lot of science fiction. I don't remember whether I was expecting humanoid robots to appear in my lifetime, but I remember understanding that before something like Asimov's Three Laws of Robotics could be applied, there were many difficult lower abstraction level problems to solve. You know like how to sense and interpret what's happening in the environment, how to manipulate everyday objects, and how to understand and produce speech.

I decided to build my own autonomous robot years ago. I read "Mobile Robots - Inspiration to Implementation" by Joseph L. Jones and Anita M. Flynn (the first edition) and even got some robot parts (a two-wheel differential drive base kit consisting of round plastic platforms and a couple of servos). The parts have been sitting in the closet for quite some time, but I supposedly never had the time to actually begin building my machine. You know: other hobbies, family, work, etc.

Recently I went through a surgical operation followed by a couple of weeks of sick leave. This seemed like a perfect opportunity to start my project. I actually made advance preparations, i.e. purchased some stuff from Ebay and Robot Shop, to make sure I could begin working immediately when I got home from the hospital.

Asimov's three laws have no application in my humble project, so instead I'll apply the Three Laws of Recreational Robotics I just invented:

  1. Start simple.
  2. Improve endlessly.
  3. Have fun.
In my upcoming posts I will write about my progress and maybe something about general robot-related subjects as well. The main purpose is to document the project for myself, but maybe somebody else out there is going to find this interesting or even useful. And of course it would be great to receive comments or advice!